
DIY Make CO2 Sensor
please review what you need to do for setting up the scd30 sensor
Raspberry pi OS
The following instructions are for both the Raspberry pi zero and 3B
- Download the Latest PI OS from https://www.raspberrypi.org/software/
- Use your PC or Mac to run the application for putting the OS on your memory card.

- Do not install the lite OS version.
Loading the OS on the Pi
- Attach Kneeboard and Mouse to USB ports
- Attach HDMI cable to Monitor and Pi
- Attach Ethernet Cable (optional)
- Attach Power Supply to Pi
- As it boots, follow the instructions on the Monitor.
- The last part will ask for Update Software.
- Just take a break. This will take some time.
- When finished, select restart.
Setting up the environment for the Pi.
- After reboot
- Click on the Raspberry pi at the top left.
- Select Preferences
- Select Raspberry PI Configuration
- Select interfaces
- Enable SSH, VNC, and I2C
- Select Location
- Set Time zone US and (your local time zone)
- Select System
- Change Password
SSH into the Pi
You can now disconnect HDMI, USB from the Pi. No longer needed.
- Note the IP address by left-clicking on the Wi-Fi icon on the top right side. You will need it to SSH.
- There are several apps for SSH into the Pi.
- I like to use Bitvise on my computer.
- If you haven’t download Bitvise: SSH software for Windows, do it now.
- On the Pi, which is a Linux system. You will need to learn how to use an editor for it. The most common is the nano. It is just a line command editor that comes with the Pi OS.
- Log in as the User Pi and the password.
- The default password is “raspberry if you did not change it.
There now more tweaks that we need to add to the PI OS.
- Make a static IP address.
- There are two kinds of IP address, DHCP and Static. DHCP means the router will assign an IP address. This can be random and change from time to time. We need to have an IP that is always the same. Most IP addresses from 2 to 255. If you have access to the router you can set up a static there if not choose a number that is 200 or higher and follow this URL: (link)
- One way to see if an IP is being used is to run cmd on your computer and type arp -a. This will give a list of most IP’s being used on your local network.
- It is possible that if you choose an IP that is not currently being used and you could get a duplicate IP address error.
-
add software for the creating web Pages
-
- In order to have a web page to display the CO2 data, we will use a web server. The APACHE service will provide this option.
- Install the following from: How to Setup a Raspberry Pi Apache Web Server – Pi My Life Up.
-
note in order to have read-write to the HTML directory dot the following;
-
- cd /var/www
- sudo chmod 777 html
-
Add Plotting software:
Follow the link below:
sudo apt install python3-matplotlibsudo pip3 install matplotlib
creat a test file name it testplot.py
import matplotlib.pyplot as plt #import the Python Matplotlib sub-module for graph plotting pyplot.
x = [1,2,3,4] # x axis
y = [1,2,3,4] # y axis
plt.plot(x,y)# plotting the graph
#plt.show() #Displaying the figures
plt.savefig('Matplotlib_save_plot.png')sudo reboot from the xterm
run with “python3 testplot.py”
This will create a png file. Duble click on it from the remoter ssh file manger and you see the following graph.

- Set up the run environment
- On the PC download the zip file.
- in your browser type larry4u.com/data
- click on data_co2SCD30.7z this will download all files need to run the programs.
- unzip the file copy the files to the Pi using Bitvise, as follows:
- to the pi home directory (/home/pi) using your mouse move these files:
- clean_data_folder.py
- display_co2.py
- example.py
- get_co2.py
- readCSV.py
- scd30.py
- testplot.py
- VCR_OSD_MONO_1.001.ttf
- Move these files to /var/www/html and delete the index.html
- index.php
- download.php
- selectFile.php
- Need one more file by doing a symbolical link to the data_folder in the pi home directory
- copy and paste the following in the xterm:
- cd /var/www/html
- ln -s /home/pi/data_folder data_folder
- ls -ltra (this will show all the files plus the linked data_folder
- copy and paste the following in the xterm:
- to the pi home directory (/home/pi) using your mouse move these files:
- On the PC download the zip file.
- Load the software for controlling the display module
- Follow the following link: Using an I2C OLED Display Module with the Raspberry Pi – Raspberry Pi Spy (raspberrypi-spy.co.uk)
-
Connecting the SCD30 Hardware
- Break off 4 of the male-to-male pins
- Put on the first four pinholes of the SCD30 and solder.
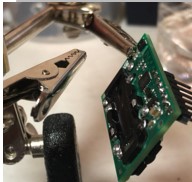

SCD30 connection
- VDD 3v3 Power pin 1
- GND Ground pin 6
- TX/SCL I2CL SDA pin 5
- RX/SDA I2C SDA pin 3
- PINs as per the chart
Steps to read data from SCD30
-
- fallow instructions from GitHub – paulvha/scd30_on_raspberry: Program to set and read SCD30 on a raspberry Pi
- To test if the pi sees the sensor works, run the example.py file you copy to /home/pi directory.
- In your SSH terminal at the pi home directory, type:
- python3 -m pip install scd30_i2c
- Python3 example.py
- If you see this, the wiring is right.
Write data to the monitor.
- Create a folder “data_folder” with the following command:
-
-
- In the SSH terminal, type at the pi home directory:
- mkdir data_folder
- In the SSH terminal, type at the pi home directory:
-
- Run the script scd30.py that you put in the pi directory.
- from SSH type “python3 scd30.py”
- This script reads the SCD30 data and updates the current.txt file that the Website sees and also writes the data to a daily file in the data_folder.
- This will run the scd30.py every minute and update the “current.txt” file, which uploaded to the web page.
-
Create a crontab job
- A cron job is an automated program developed for Unix and Linux systems. It allows the user to execute several commands at a specific time on a precise date.
- We need to run the python script scd30.py every minute. To do that, we use the command crontab.
- “crontab –l” (that is, lowercase L” lists what is in the file, and crontab –e lets us edit or add new jobs.
- Type crontab –e
- It now asks what editor to use.
- /bin/nano works much like note pad.
- vim is used mostly by gurus.
- ed is an ancient editor.
- If new to Unix, use nano.
- Add this line to the bottom of the file:
- * * * * * python3 /home/pi/scd30.py
- * * * * * python3 /home/pi/readCSV.py > /home/pi/CSV.log
- * * * * * python /home/pi/get_co2.py > /home/pi/get_co2.log
- 5 0 * * * python /home/pi/clean_data_folder.py > /home/pi/clean.log
- This will run these programs at a scheduletime.
- see Crontab.guru – The cron schedule expression editor for corn details.
Notes
- The “current.txt” file is just an HTML file the is updated by the program scd30.py
- The data files in the directory “data_folder” and are created at the first run after midnight. The files names contain the date it was created. They are CSV files that can be open in excel.
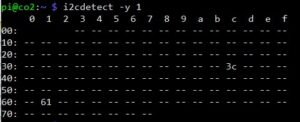
- i2cdetect -y 1 use this command to test that the monitor and the sense are working. This is what you should see. 3c is the monitor and 61 is the scd30 sensro.
Comments
DIY SCD30 Monitor — No Comments
HTML tags allowed in your comment: <a href="" title=""> <abbr title=""> <acronym title=""> <b> <blockquote cite=""> <cite> <code> <del datetime=""> <em> <i> <q cite=""> <s> <strike> <strong>