
 Requirements:
- Some knowledge of:
- Working with web page WWW
- HTML
- PHP
- Python
- nano or vi Linux editor
- don’t worry if you do not have these skills. I have written the programs that you will need to run the meter. You will be able to download them to your computer and then upload them to the raspberry pi.
- Working with web page WWW
This would be a great project to learn how to code
- Software apps needed
- Things you will need for setting up the Raspberry pi that you may have around the house
- extra monitor (a TV with HTML could work)
- extra keyboard and mouse
- extra HDMI cable
- soldering iron (some libraries offer them for use, same with a 3d printer)
- a 3D printer (optional)
- Hardware
- Raspberry pi Zero (or a Raspberry pi 3B if you do not do the 3D Pi zero printed case).
- when purchasing, get one with a memory card and power adapter, heat sink, and pinouts. ( you may have an extra power adapter at home from used with your cell phone. If you are not going to print the 3D case, you may want to purchase the one that is available for the raspberry pi.
- Search Amazon for raspberry pi zero. There are many options. There is one that won’t need soldering. You will need a memory card, an HDMI adapter, and a USB adapter. However, you will need to plug in both keyboard and mouse to the USB port, so the USB adapter recommended is the link below. If you have a USB splitter that will work along with the USB adapter made for the Pi.
- Raspberry pi Zero HDMI adapter (Amazon LINK)
- not needed if using a Raspberry Pi 3B
- Raspberry pi Zero USB adapter (Amazon LINK)
- Not needed if using a Raspberry Pi 3B
- Wire Printouts and a small breadboard. (3.9-inch pinout wires and breadboard)
- when purchasing, get one with a memory card and power adapter, heat sink, and pinouts. ( you may have an extra power adapter at home from used with your cell phone. If you are not going to print the 3D case, you may want to purchase the one that is available for the raspberry pi.
- a CO2 sensor (LINKS) click on Available from these sellers.
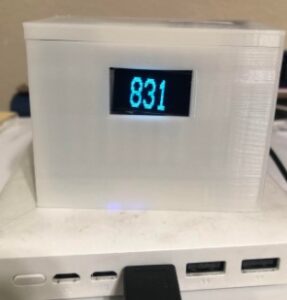
- a display (Link) If you are doing the raspberry pi 3, you may want to do this display (Link)
- If you want the STL file for the 3d printer, leave me a comment.
- Raspberry pi Zero (or a Raspberry pi 3B if you do not do the 3D Pi zero printed case).
To continue you will need a login id. Email me at leldredge@gmail.com
Comments
SCD30 Sensor; Assembly Protocol — No Comments
HTML tags allowed in your comment: <a href="" title=""> <abbr title=""> <acronym title=""> <b> <blockquote cite=""> <cite> <code> <del datetime=""> <em> <i> <q cite=""> <s> <strike> <strong>